Finding the Right Part for Your Hayter: How to Use Model Numbers and Parts Diagrams
Date Released: 1 Mar 2026 Category: Blog
Ordering the wrong part for your Hayter is one of those frustrations that's entirely avoidable if you know where to look. The trouble is, Hayter has been making excellent lawn mowers since 1946, which means there are decades worth of models out there, each with their own specific parts. A blade that fits a Harrier 48 might look identical to one for a Harrier 56, but those subtle differences matter when you're trying to get your mower back up and running.
The good news is that finding the correct part isn't nearly as complicated as it might seem. You just need to know where to find a few key pieces of information on your mower, and how to make sense of the parts diagrams that every Hayter dealer provides. Let's walk through it step by step.
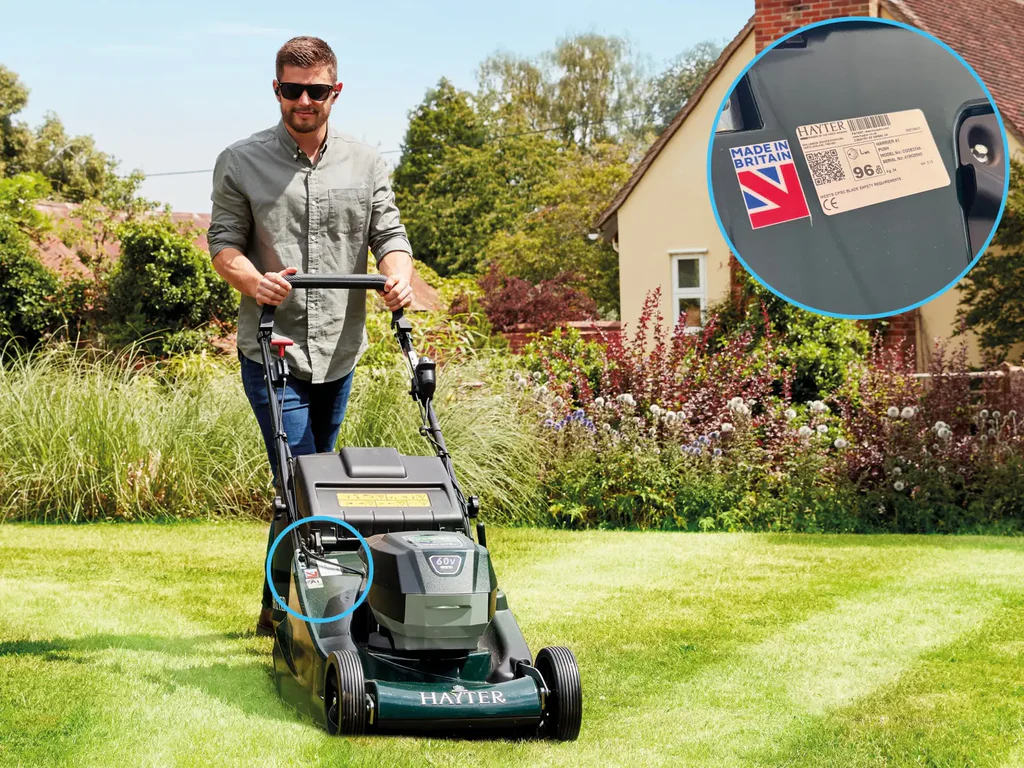
For most Hayter models, you'll find the identification plate on the rear of the cutting deck, roughly between where the handles attach. It's usually a silver or white sticker, and it'll have your model code, serial number, and date of manufacture printed on it. If you've got an older Hayter from before 2000, you might find the plate on the side of the deck instead, so have a look there if you're coming up empty on the rear.
Hayter uses a wonderfully simple system for their model codes. Unlike some manufacturers who seem to delight in cryptic alphanumeric sequences, Hayter's codes are just three numbers followed by a single letter. So you might have a 411A, a 490D, or a 579J. That's your model code, and it's the single most important piece of information you need when ordering parts.
Write this number down somewhere safe, or better yet, take a photograph of the entire identification plate with your phone. You'll be referring back to it more than once, and it's much easier than crawling around on the ground every time you need to order something.
The model number on your deck tells you about the mower itself, which is perfect for ordering things like blades, rollers, grass bags, cables, wheels, and anything else that's part of the actual Hayter machine. But if you need an engine part, such as a carburettor, spark plug, gasket, or air filter, you'll need to identify the engine separately.
Most Hayter mowers use engines from Briggs & Stratton, Honda, or Hayter's own engines. The engine will have its own identification plate, usually stamped into the metal casing near the spark plug or on top of the valve cover. This plate will show the engine model, type, and code. For engine parts, you need these engine numbers, not your mower's model code.
It sounds like doubling your work, but it's actually quite straightforward once you understand that the mower and the engine are two separate things that just happen to work together.

A parts diagram is what's called an "exploded view" of your mower. Imagine someone has carefully taken your Hayter apart and laid out every single component in the order they fit together, then drawn a detailed picture of the whole arrangement. That's essentially what you're looking at.
Each part in the diagram has a reference number next to it, and these numbers correspond to a parts list that tells you the official Hayter part number, what the component is called, and often how many of them your mower uses. Some diagrams are interactive, which means you can click on a part in the picture and it'll take you straight to the ordering page for that component.
The real beauty of these diagrams is that they remove all the guesswork. You don't need to try to describe what a part looks like or guess whether it's the right size. You just find it on the diagram for your specific model, note down the part number, and order it with confidence.
Well, not quite. Hayter parts can look remarkably similar whilst having subtle but crucial differences. Two blades might have the same cutting width and appear identical at first glance, but one might have different mounting holes or a slightly different profile that affects how it balances on the spindle. Using the wrong one might work for a bit, but it could lead to poor cutting quality, excessive vibration, or premature wear.
The same goes for seemingly simple items like belts, cables, and fasteners. They're designed to fit specific models with exact tolerances, and whilst a close match might seem good enough, it's rarely worth the hassle when the correct part is readily available.
This is where the serial number and date of manufacture from your identification plate become important. The parts diagram will usually specify which serial number ranges each part fits, so you can narrow it down to exactly the right component for your specific machine.
If you're ever in doubt, particularly with older models where things can get a bit murky, it's worth measuring the part you're replacing or taking a photograph to compare with the product description. Most reputable parts dealers are happy to help confirm fitment if you're uncertain.
Genuine parts are manufactured to Hayter's exact specifications, which means they'll fit properly, last longer, and maintain your mower's performance. You've invested in a premium British-made mower, and fitting inferior parts is a bit like putting budget tyres on a sports car. It might work, but you're not getting the performance or longevity you paid for.
Find your model in the list, select the appropriate diagram page for the area of the mower you're working on, such as the deck, handle assembly, or roller, and locate the part you need. Make a note of the part number, double-check it matches your serial number range if specified, and you're ready to order.
Most parts dealers will also have helpful product descriptions that list which specific models each part fits, giving you an extra layer of confidence that you're ordering the right thing. If something doesn't seem quite right or you're struggling to identify which part you need, don't hesitate to get in touch with the dealer directly. They deal with these enquiries every day and can usually sort you out quickly with a photo or description of what you're after.
Your Hayter was built to last for decades with proper maintenance, and keeping it running with the correct genuine parts is the best way to ensure it continues to deliver those perfect British stripes for years to come.
The good news is that finding the correct part isn't nearly as complicated as it might seem. You just need to know where to find a few key pieces of information on your mower, and how to make sense of the parts diagrams that every Hayter dealer provides. Let's walk through it step by step.
Where to Find Your Hayter's Model Number
The first thing you need to track down is your mower's identification plate. This little sticker contains everything you need to know about your specific machine, and Hayter has helpfully put it in the same place on nearly all their mowers.For most Hayter models, you'll find the identification plate on the rear of the cutting deck, roughly between where the handles attach. It's usually a silver or white sticker, and it'll have your model code, serial number, and date of manufacture printed on it. If you've got an older Hayter from before 2000, you might find the plate on the side of the deck instead, so have a look there if you're coming up empty on the rear.
Hayter uses a wonderfully simple system for their model codes. Unlike some manufacturers who seem to delight in cryptic alphanumeric sequences, Hayter's codes are just three numbers followed by a single letter. So you might have a 411A, a 490D, or a 579J. That's your model code, and it's the single most important piece of information you need when ordering parts.
Write this number down somewhere safe, or better yet, take a photograph of the entire identification plate with your phone. You'll be referring back to it more than once, and it's much easier than crawling around on the ground every time you need to order something.
Understanding What You're Actually Looking At
Here's where people sometimes get a bit confused. Your Hayter mower is actually made up of components from different manufacturers, and depending on what part has failed, you might need information from more than one place.The model number on your deck tells you about the mower itself, which is perfect for ordering things like blades, rollers, grass bags, cables, wheels, and anything else that's part of the actual Hayter machine. But if you need an engine part, such as a carburettor, spark plug, gasket, or air filter, you'll need to identify the engine separately.
Most Hayter mowers use engines from Briggs & Stratton, Honda, or Hayter's own engines. The engine will have its own identification plate, usually stamped into the metal casing near the spark plug or on top of the valve cover. This plate will show the engine model, type, and code. For engine parts, you need these engine numbers, not your mower's model code.
It sounds like doubling your work, but it's actually quite straightforward once you understand that the mower and the engine are two separate things that just happen to work together.
Making Sense of Parts Diagrams
Once you've got your model number, the next step is to look at a parts diagram. These are available on most Hayter parts dealers' websites, and they're absolutely invaluable for making sure you order exactly the right component.A parts diagram is what's called an "exploded view" of your mower. Imagine someone has carefully taken your Hayter apart and laid out every single component in the order they fit together, then drawn a detailed picture of the whole arrangement. That's essentially what you're looking at.
Each part in the diagram has a reference number next to it, and these numbers correspond to a parts list that tells you the official Hayter part number, what the component is called, and often how many of them your mower uses. Some diagrams are interactive, which means you can click on a part in the picture and it'll take you straight to the ordering page for that component.
The real beauty of these diagrams is that they remove all the guesswork. You don't need to try to describe what a part looks like or guess whether it's the right size. You just find it on the diagram for your specific model, note down the part number, and order it with confidence.
Why Model-Specific Parts Actually Matter
You might be wondering whether all this fuss about model numbers and diagrams is really necessary. After all, a blade is a blade, isn't it?Well, not quite. Hayter parts can look remarkably similar whilst having subtle but crucial differences. Two blades might have the same cutting width and appear identical at first glance, but one might have different mounting holes or a slightly different profile that affects how it balances on the spindle. Using the wrong one might work for a bit, but it could lead to poor cutting quality, excessive vibration, or premature wear.
The same goes for seemingly simple items like belts, cables, and fasteners. They're designed to fit specific models with exact tolerances, and whilst a close match might seem good enough, it's rarely worth the hassle when the correct part is readily available.
When Your Model Number Leads to Multiple Options
Occasionally, you'll look up your model number and find that there are several variations or different serial number ranges. This is because Hayter sometimes makes running changes to models during their production life. A Harrier 48 from 2010 might use slightly different parts to a Harrier 48 from 2015, even though they share the same basic model code.This is where the serial number and date of manufacture from your identification plate become important. The parts diagram will usually specify which serial number ranges each part fits, so you can narrow it down to exactly the right component for your specific machine.
If you're ever in doubt, particularly with older models where things can get a bit murky, it's worth measuring the part you're replacing or taking a photograph to compare with the product description. Most reputable parts dealers are happy to help confirm fitment if you're uncertain.
The Importance of Genuine Hayter Parts
When you're browsing parts, you'll sometimes see cheaper alternatives to genuine Hayter components. Pattern parts can be tempting when you're trying to save a few pounds, but they're rarely worth the compromise for a quality machine like a Hayter.Genuine parts are manufactured to Hayter's exact specifications, which means they'll fit properly, last longer, and maintain your mower's performance. You've invested in a premium British-made mower, and fitting inferior parts is a bit like putting budget tyres on a sports car. It might work, but you're not getting the performance or longevity you paid for.
Getting Started with Your First Parts Order
The process of ordering your first Hayter part can feel a bit daunting, but once you've done it successfully, you'll find it becomes second nature. Start by locating your identification plate and writing down your model code, serial number, and date of manufacture. Then visit a reputable Hayter parts dealer's website and look for their parts diagrams section.Find your model in the list, select the appropriate diagram page for the area of the mower you're working on, such as the deck, handle assembly, or roller, and locate the part you need. Make a note of the part number, double-check it matches your serial number range if specified, and you're ready to order.
Most parts dealers will also have helpful product descriptions that list which specific models each part fits, giving you an extra layer of confidence that you're ordering the right thing. If something doesn't seem quite right or you're struggling to identify which part you need, don't hesitate to get in touch with the dealer directly. They deal with these enquiries every day and can usually sort you out quickly with a photo or description of what you're after.
Your Hayter was built to last for decades with proper maintenance, and keeping it running with the correct genuine parts is the best way to ensure it continues to deliver those perfect British stripes for years to come.